Instagram Carousel Splitter
Turn one wide design into seamless 4:5 swipeable slides for a single Instagram carousel post. Crop, split, and download everything as a ZIP entirely in your browser.
Drop a wide image here or click to choose
JPG, PNG, WebP, GIF, BMP, AVIF, up to 20 MB
Need other split layouts? Use the full image splitter tool · Instagram Grid Maker
What is an Instagram Carousel Splitter?
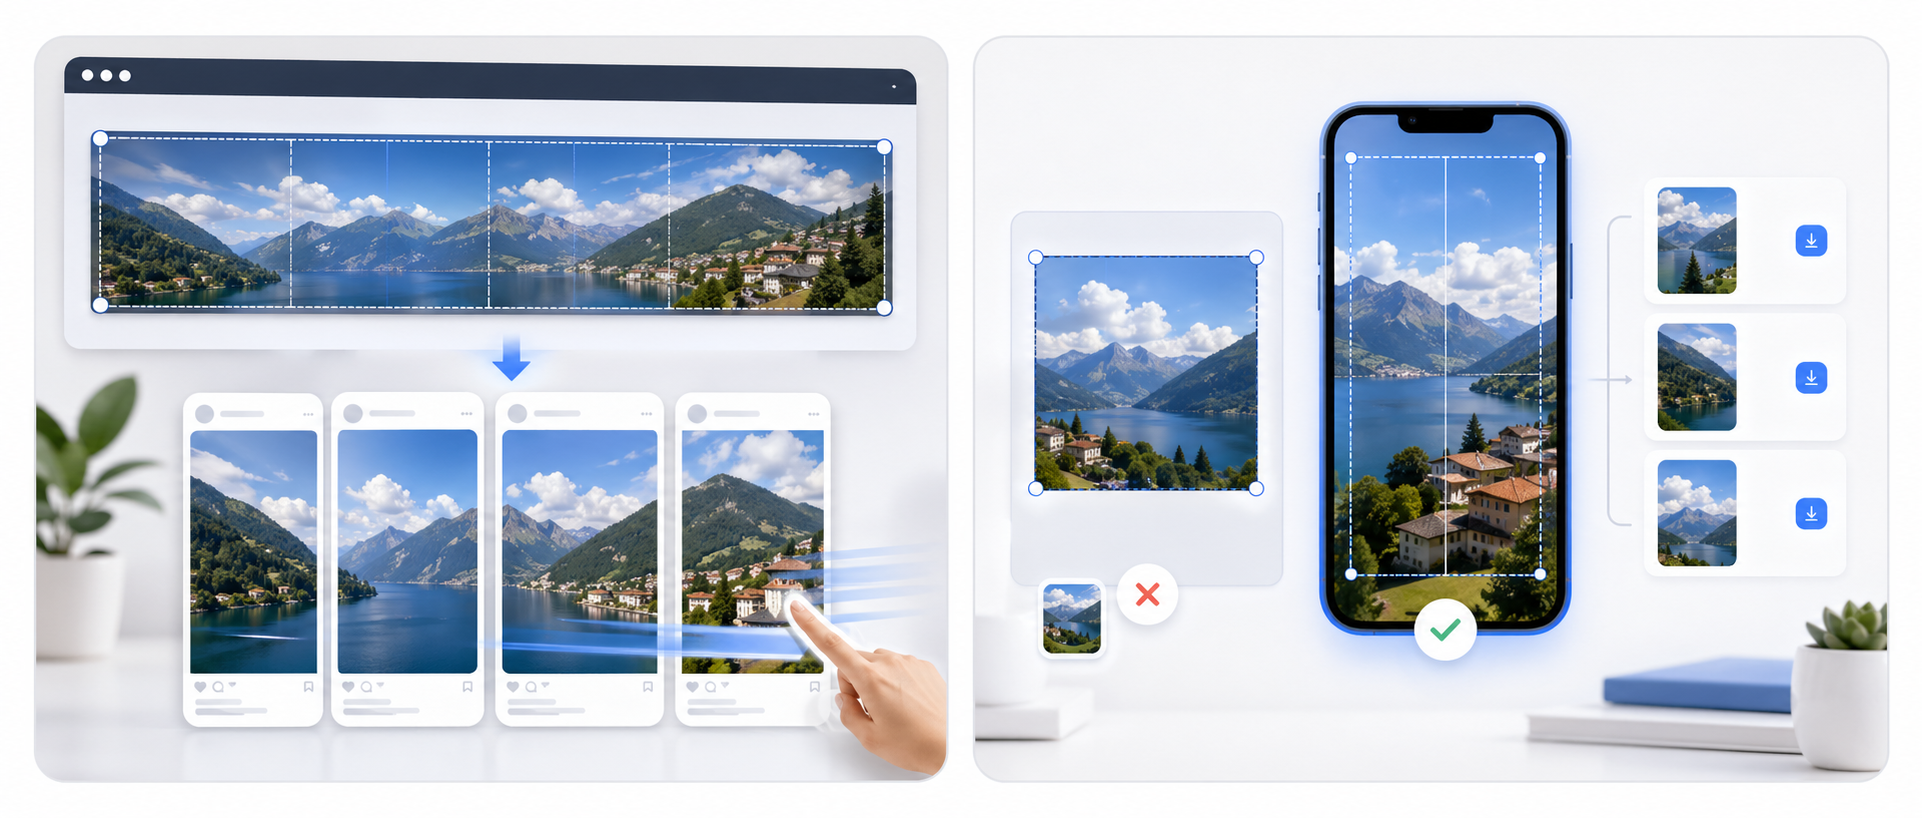
An Instagram Carousel Splitter turns one wide composition into multiple 4:5 portrait slides that you publish inside the same Instagram post. Instead of making a profile puzzle, the goal here is a seamless swipe experience: slide 1 flows into slide 2, slide 2 flows into slide 3, and so on.
This is different from an Instagram grid maker. A grid maker is built for profile mosaics that are posted as separate posts. A carousel splitter is built for one single swipeable post where each panel must already be ready for the feed.
Carousel vs Grid: use the right workflow
Carousel splitter
Best when you want one post with 3-10 slides that people swipe through left to right.
Grid maker
Best when you want a profile puzzle feed built from separate posts displayed on the grid.
Why 4:5 is the default for Instagram carousels
4:5 portrait slides take up more vertical space in the feed than square images. That means the first slide looks bigger, holds attention longer, and gives your swipe sequence a better chance of getting noticed.
For a seamless carousel, every exported panel needs to stay 4:5. This tool crops the full strip to the correct combined ratio first, then slices it into exact portrait slides.

Recommended slide counts
You can publish anywhere from 2 to 10 slides, but these setups are the most common for storytelling and product showcases.
| Slides | Overall ratio | Best for |
|---|---|---|
| 3 slides | 12:5 overall strip | Simple stories, before/after, short product reveals |
| 4 slides | 16:5 overall strip | Most balanced setup for campaigns and swipe storytelling |
| 5 slides | 20:5 overall strip | Feature breakdowns, portfolio reveals, tutorial intros |
| 6-10 slides | 24:5 to 40:5 | Long explainers, multi-step narratives, deep product launches |
How to make a seamless Instagram carousel
Panoramas, campaign banners, editorial layouts, or stitched mockups work best because the design already has a left-to-right flow.
Pick how many 4:5 panels you want, then move the crop until faces, text, and transitions sit cleanly inside each slide.
Download the ZIP, then upload slide 1, slide 2, slide 3, and so on inside one Instagram carousel post.
Best practices for better carousel results
- Keep important text away from the vertical cut lines between slides.
- Use stronger contrast on slide 1 because it acts as the hook in the main feed.
- Choose 1080×1350 export for most posts; use HD only when your source art is already clean and detailed.
- If a face or product sits near a cut line, nudge the crop before exporting instead of fixing it after download.
- Use 3-5 slides for simple stories and 6-10 only when the design genuinely benefits from a longer sequence.
Instagram Carousel Splitter FAQ
What image ratio should I start with? ▼
Any source ratio can work because the tool crops automatically. You will get the cleanest result when the artwork is already wide enough for the number of slides you want.
What is the correct upload order? ▼
Upload left to right as slide 1, slide 2, slide 3, and so on inside a single Instagram carousel post.
How is this different from the Instagram Grid Maker? ▼
The grid maker is for profile mosaics posted as separate posts. This carousel splitter is for one swipeable post made of multiple 4:5 slides.
Can I use PNG instead of JPG? ▼
Yes. PNG is helpful for graphics and text-heavy layouts, while JPG is usually smaller and ideal for photography.
Are my images uploaded to your server? ▼
No. The crop, preview, slicing, and ZIP generation all happen locally in your browser.